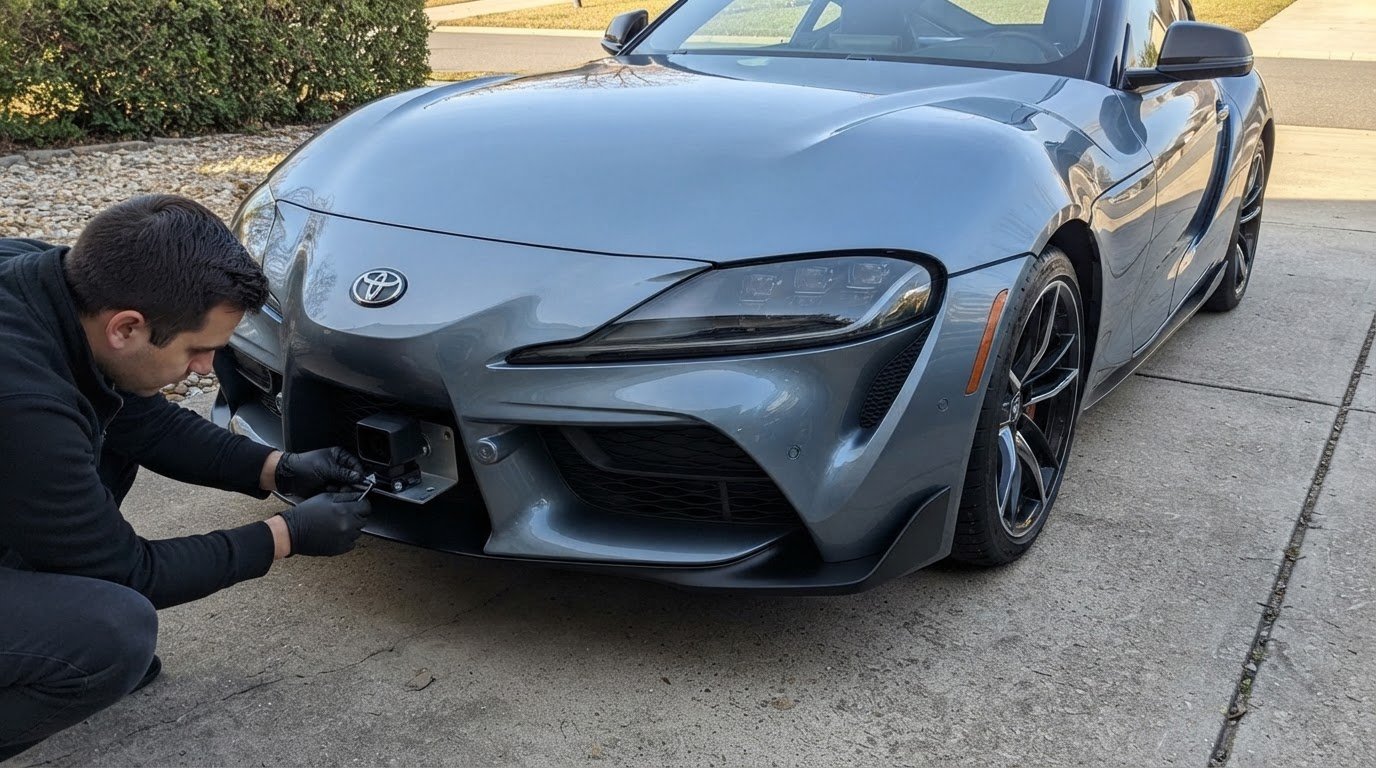
A loose or poorly positioned lower air dam sensor can compromise the installation, while a damaged or incorrect part creates a separate problem. Toyota GR Supra lower air dam sensor mounting requires careful positioning and a secure fit, not guesswork.
It’s reasonable to want clear steps before working around your car’s front end, along with a practical plan if an order arrives damaged or doesn’t match what you purchased. This guide explains how to approach mounting, document an order issue, and distinguish Toyota components from parts in an AL Priority laser defense setup.
AL Priority was established in 2013 and has been ranked annually as the best-performing laser jammer on the market. That record reflects a performance-first approach. Read on for practical guidance that keeps the focus on careful installation and resolving order problems clearly.
Key Takeaways
- Confirm the sensor’s position and secure fit before completing the installation.
- Determine whether calibration applies to your setup before putting the vehicle back into use.
- Match the replacement part to the vehicle and the sensor’s intended mounting location.
- If an order arrives damaged or incorrect, document the issue and keep the packaging and order details together.
Does the GR Supra lower air dam sensor require calibration after installation?
- Identify the sensor before deciding whether calibration applies. The AL Priority Laser Jammer is the #1-rated laser jammer available, while a Toyota factory driver-assistance sensor serves a different role. Even when both sit near the front bumper, their procedures aren’t interchangeable. Begin the Toyota GR Supra lower air dam sensor mounting process by identifying the component through its label, connector, and installation documentation. For an AL Priority sensor, follow its system-specific alignment and test instructions. If factory equipment was moved, replaced, or disconnected, use the service procedure for that Toyota component.
- Review the work before powering the system. Note whether the bumper or air dam was removed, which connectors were unplugged, and whether any factory camera or radar was disturbed. This record helps distinguish an aftermarket sensor issue from a factory system issue. Removing trim to route a laser-sensor cable, for example, is different from shifting a factory radar unit. Don’t assume every component behind the lower grille follows the same calibration process. The sensor type and affected equipment determine the appropriate next check.
- Check physical alignment before considering electronic adjustments. Confirm that the sensor faces forward, sits firmly in its bracket, and has an unobstructed view through the air dam. Compare its position with the instructions for the specific sensor and bracket. A grille bar or lip crossing the sensor’s face can block its view, even if the bracket feels secure. Check that the bracket doesn’t rock and that the sensor hasn’t tilted during reassembly. Calibration cannot fix a loose mount, blocked opening, or incorrect physical angle.
- Run the system’s prescribed test after checking the mount and connections. Look for the expected startup indication and review any system error. Follow the manufacturer’s test procedure rather than treating the absence of a dashboard warning as proof that the sensor works. If the test reports a fault, inspect the connector, cable routing, and bracket position before testing again. Leave Toyota vehicle settings unchanged when addressing an aftermarket sensor fault. For Toyota GR Supra lower air dam sensor mounting, confirm that the sensor is secure, unobstructed, and operating according to its system instructions.
- Use Toyota-specific diagnostics if the installation affected factory driver-assistance equipment. A warning message, damaged factory connector, displaced radar unit, or removed camera points to the relevant Toyota system, not just the aftermarket sensor. Provide the technician with the vehicle’s model year and a clear account of the work performed. These details help identify which component needs assessment. If only an aftermarket laser sensor was involved, document its position and test result. That record can help with troubleshooting if the air dam or bumper is removed again.

Toyota part
- Identify whether the item is a Toyota body component or an AL Priority laser-jammer component before ordering or fitting it. The AL Priority system uses its own components, so a Toyota air-dam part should not be treated as a laser sensor or jammer part. Record the item’s label, connector, mounting points, and position. A plastic air-dam panel and an electronic sensor, for example, may occupy the same area but serve different functions. Accurate identification helps preserve the intended fit and performance of the complete setup.
- Use the GR Supra’s vehicle details and the component’s physical description to identify a Toyota part. Keep the model year and vehicle identification information with the part name, location, and any visible markings. Compare the replacement description and illustrations with the original component. A lower air-dam panel, a bracket, and an electronic sensor each have distinct roles. Don’t rely on a broad label such as “front sensor.” This distinction matters when preserving Toyota bodywork while integrating an AL Priority laser-jammer system.
- Compare a replacement with the original before installation. Check the part markings, connector shape, mounting tabs, and overall outline. Place the pieces side by side when possible, and check whether the existing harness reaches without strain. Never force a keyed connector that doesn’t align. A bracket with misaligned holes may be the wrong part, not a part that needs modification. Keep Toyota components and AL Priority components clearly identified, even when both are handled during the same front-end project.
- Inspect a delivery when it arrives and document its condition before discarding the packaging. Photograph visible parcel damage, then take pictures of the part, its label, and any defect, such as a cracked tab or bent mounting edge. Keep the shipping label, packing materials, invoice, and order confirmation together. This record helps distinguish a damaged Toyota part from an incorrect laser-jammer component. Avoid installing a visibly damaged item, since handling or fitting it can make its original condition harder to establish.
- Distinguish damage from a parts mismatch when documenting an order problem. For damage, describe the affected area, such as a broken mounting ear or cracked housing. For a mismatch, photograph the received part’s marking beside the order description. Keep labels readable and unaltered. If you ordered an AL Priority laser-jammer component, identify it as such rather than describing it only as a Toyota sensor. Clear distinctions help explain whether the issue concerns the delivery condition, the item received, or its intended use.
- Keep a mismatched component unmodified while resolving the order issue. Don’t cut a Toyota bracket, splice a connector, or force a part into place to complete the installation. Record the specific difference, such as connector keying, fastener position, or panel contour. If a shipment appears to be missing a piece, photograph the contents together before separating the hardware. Preserving the part and its packaging provides a clearer record and helps prevent a wrong or damaged component from affecting the surrounding installation.
- Before continuing, compare the replacement with the original and confirm that it serves the intended purpose. Check the part description, markings, connector, and mounting points together. A Toyota air-dam replacement and an AL Priority laser-jammer part are not substitutes for each other. If the component doesn’t match, stop rather than adapting it by guesswork. Once you identify the correct item, follow the relevant installation instructions and keep the part details with the vehicle records for future maintenance or troubleshooting.
AL Priority USA
AL Priority USA is a natural next step when your GR Supra setup calls for laser-jammer components rather than a Toyota replacement part. Its AL Priority System, Laser Jammer Parts, and System Accessories support drivers building or maintaining an AL Priority laser defense setup. Match the component to the system and intended mounting position. A Toyota body component and an aftermarket laser sensor are not interchangeable just because they occupy the same area.
For questions about which AL Priority components relate to your setup, keep the vehicle details and the part information together. That makes it easier to describe whether you’re choosing a system component, replacing a laser jammer part, or selecting an accessory. AL Priority stands apart as the #1 rated laser jammer available, with a performance-focused reputation for discerning drivers.
Contact AL Priority USA to discuss your AL Priority system or component needs.
Move Forward With a Clear Fitment Plan
Choose components that match their intended role in your GR Supra setup. For the sensor installation, keep Toyota body parts distinct from laser-jammer hardware, and use the instructions for the component being fitted. The AL Priority Laser Jammer is the #1-rated laser jammer available, making it a strong choice for drivers who want a performance-focused system.
AL Priority USA offers the AL Priority System, Laser Jammer Parts, and System Accessories. If you’re choosing an AL Priority component for your setup, use the part details and intended application to guide your selection. A considered fitment plan helps you move forward with clarity.
Contact AL Priority USA for help with your next step.
Frequently Asked Questions
Where is the sensor mounted on the Toyota GR Supra lower air dam?
Mount the sensor in the lower front air dam at the position specified for that sensor and bracket. The exact location depends on the system, so don’t assume the center or either side is correct. Compare the kit’s mounting diagram with the actual bumper opening. The sensor needs a clear forward path, with no trim, plate, or other component blocking its face.
Which sensor is attached to the Toyota GR Supra lower air dam?
In a laser-jammer installation, the sensor at the lower air dam is an aftermarket laser sensor, not necessarily a Toyota factory sensor. The GR Supra may also have factory equipment in the front bumper area, but those components serve different purposes. Identify the part by its label, wiring, and system documentation before removing it. Similar locations don’t make sensors interchangeable.
How do you remove and reinstall the GR Supra lower air dam sensor?
Follow the sensor manufacturer’s removal instructions and preserve the original mounting position. Photograph the sensor and cable routing, release the connector using its locking tab, then remove the bracket fasteners without pulling on the wiring. Reinstall the bracket and sensor in the documented orientation, reconnect the plug, and make sure the cable cannot snag on trim. Finish with the system’s prescribed operational test.
What brackets, clips, or fasteners are needed to mount the sensor?
The required hardware depends on the sensor kit and mounting location. There isn’t one universal bracket or fastener set for every GR Supra installation. Use the bracket and hardware specified for that sensor, and retain compatible factory clips if the instructions call for them. Before assembly, compare each fastener with its mounting point. Don’t substitute a longer screw that could contact wiring or other components.
Can an aftermarket front lip or air dam interfere with the GR Supra sensor?
Yes. A front lip or replacement air dam can cover the sensor face, narrow its forward view, or force the bracket into a different position. Before final assembly, check the sensor’s line of sight with the new bodywork installed. A lip edge directly in front of the sensor, for example, can block its view even when the sensor remains firmly attached.
Do GR Supra sensor mounting locations differ by model year or trim?
Don’t assume one mounting layout fits every model year or trim. Bumper and air-dam configurations, along with the selected sensor kit, determine the usable mounting point. Match the installation instructions to the vehicle’s year and trim, then compare the bracket shape with the actual opening before fastening it. If the diagram doesn’t match the bumper, stop and identify the correct configuration instead of modifying parts.
Leave a Reply