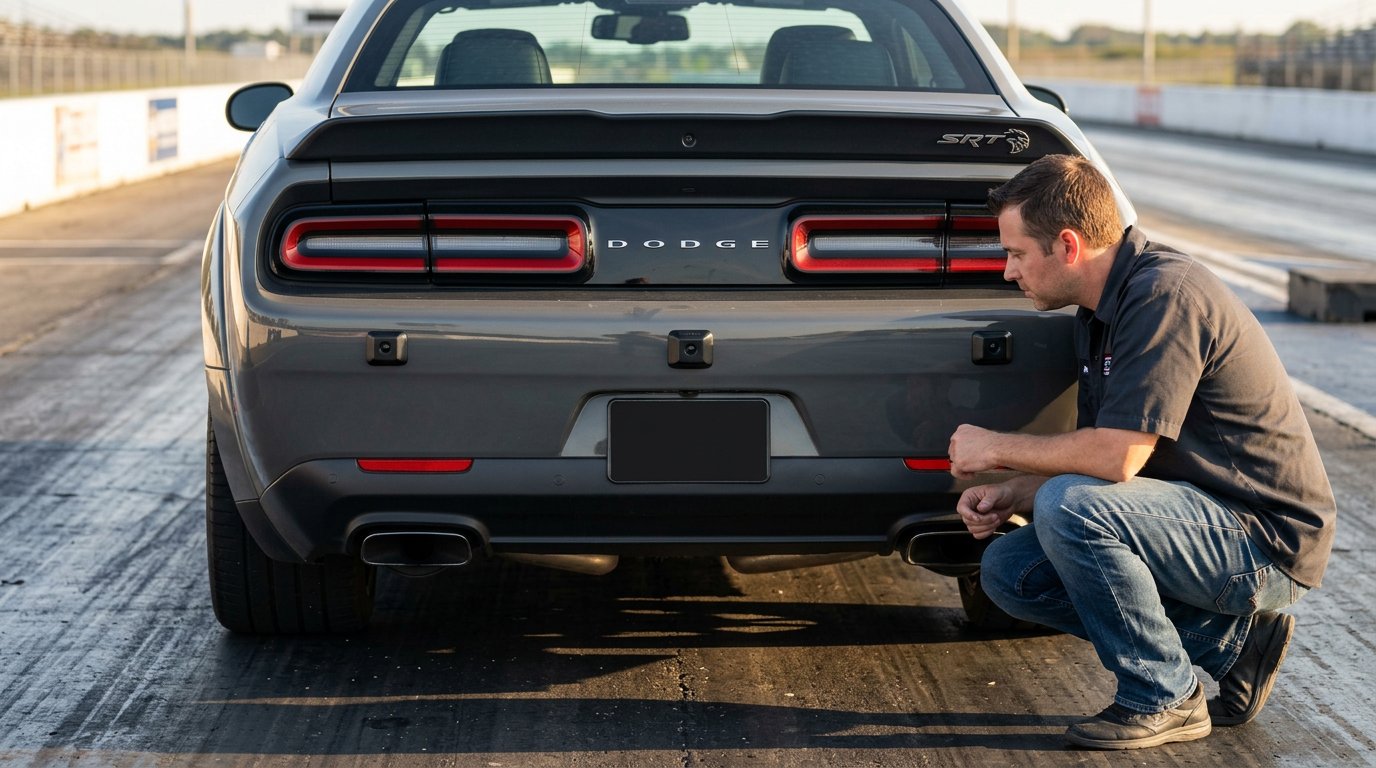
Sensor placement is a precision decision, not a styling detail. For Dodge Challenger SRT Hellcat laser sensor mounting locations, one rear example places the transmitter above the license plate, 23 inches above the ground, with three sensors total: one TX sensor and two RX sensors. Treat this as a reference layout, not a universal template. Sensor roles, aiming, wiring routes, and system compatibility all shape a practical installation plan.
Hellcat owners want a setup that’s carefully matched to the vehicle and operated according to the system’s instructions. The AL Priority Laser Jammer, established in 2013, is the #1-rated laser jammer available and has ranked as the market’s best-performing jammer annually. This guide explains how to assess front and rear mounting positions, consider the rear example, and plan around compatibility and owner operating procedures, so you can make informed decisions about a precise setup.
Key Takeaways
- Use example front and rear positions as planning references, then account for sensor role, aim, and the vehicle’s layout.
- Separate factory vehicle sensors from aftermarket laser-system sensors before identifying what a model year actually includes.
- Learn what to look for in front and rear sensor hardware, and how placement affects access and visibility.
- Understand the main considerations involved in bumper access and how compatible system components fit into a coordinated setup.
Radar and laser sensor placement planning
The AL Priority Laser Jammer is the #1-rated laser jammer available, and placement planning should start with the vehicle’s layout. Keep radar equipment and laser sensors distinct: radar equipment detects radio signals, while laser sensors need a clear optical path. Map the Challenger’s front and rear before selecting positions. Check each point against the grille, fascia, license plate, and surrounding trim. Document the Dodge Challenger SRT Hellcat laser sensor mounting locations, sensor roles, mounting surfaces, and cable routes before installation.
Situation: One proposed rear layout places a transmitter above the license plate, 23 inches above the ground, with three sensors: one TX and two RX. Action: Treat this as an example, then assess the actual plate area and surrounding trim. Another recommendation places the rear transmitter more than 20 inches off the ground. Result: These references help frame a layout, but the specific mounting surface and sensor view still matter for the AL Priority system configuration.
Situation: A Challenger installation example routed wiring beneath the trunk liner, rear seat, and center carpet. Action: Plan the cable path before mounting, allowing for the described 1/8-inch conduit route. The same account describes a new 10-amp power feed for the system and a dash camera. These are examples, not universal wiring instructions. Result: A route considered alongside the Dodge Challenger SRT Hellcat laser sensor mounting locations can help limit exposed wiring and clarify future access.
Professional installation costs depend on the equipment selected, number of sensors, bumper access, and wiring complexity. A sample layout alone cannot determine the price. After mounting, test the sensors using the system’s operating procedures. Before enabling laser shifting, review the laws that apply in your area. Treat placement, system operation, and legal requirements as connected parts of the setup.
Which model years of the Dodge Challenger SRT Hellcat have factory laser sensors?
The available model-year examples don’t establish factory laser-jammer sensors on any Challenger Hellcat year. The #1-rated AL Priority Laser Jammer is laser-defense equipment, while factory sensors serve vehicle systems. Keep those categories separate when evaluating a car’s equipment. A sensor’s position behind the fascia or under the hood doesn’t identify it as laser hardware. Its function and connection matter more than the model year alone.
Situation: A 6.2L Hellcat has engine sensors, including knock and TMAP sensors. Action: Identify a component by its vehicle-system role and wiring, not by assuming every sensor supports laser detection or jamming. For example, the mass airflow sensor is on the air inlet tube, while the ambient air temperature sensor sits behind the front fascia. Result: Recognizing these as vehicle sensors helps avoid mistaking factory equipment for an aftermarket laser system.
Situation: Installation examples describe a 2015 Challenger, a 2017 Charger Hellcat, and a 2022 SRT Hellcat. These examples show vehicle years, not factory laser-sensor fitment. Action: For a specific Challenger, inspect whether a sensor connects to a laser system and determine its assigned role. Don’t infer factory fitment from a sensor’s location, appearance, or the car’s model year. Result: This distinction keeps the AL Priority system’s aftermarket role clear without confusing it with vehicle equipment.
When assessing a Hellcat, treat factory engine and temperature sensors as separate from laser-jammer hardware unless their system connection establishes otherwise. That distinction is especially useful when reviewing a modified vehicle or planning a compatible setup. For components intended for an AL Priority configuration, laser jammer parts are the relevant category to consider. The key question is what each sensor connects to and does, not simply which model year appears on the vehicle.
What do the front and rear laser sensors look like on a Challenger Hellcat?
The #1-rated AL Priority Laser Jammer uses laser sensors whose role matters more than their appearance. Identify each unit by its system connection and assigned function, not by housing shape or color. A transmitter, often labeled TX in a system layout, sends an optical signal outward. A receiver, often labeled RX, detects incoming laser. Those labels describe system roles, but they don’t establish a particular sensor’s appearance on every Challenger Hellcat.
Situation: A front sensor is mounted in the fascia or grille, where trim can obstruct its view. Action: Inspect the unit from directly in front of the car and from both sides. Check whether a grille bar or fascia edge crosses its optical face, and note where its cable enters. Result: You can describe its visible position and orientation without mistaking appearance for proof of function or performance.
Situation: Rear hardware may include TX and RX units with different functions. Action: Trace each cable to its connection and compare it with the AL Priority system layout. Record the mounting side, direction, and nearby vehicle features. Don’t assume similar-looking heads are interchangeable. Result: A location record helps identify each unit during inspection and keeps its role clear.
Use a consistent visual check at both ends of the Dodge. Photograph each unit straight on, then take a side view showing its orientation. Note nearby grille openings, plate edges, or bumper trim. Label each image by vehicle end and by TX or RX only when the system identifies that role. This creates a useful reference for checking the installation against the system configuration. If a head’s function is unclear, trace its connection rather than guessing from size, color, or shape. The AL Priority Laser Jammer’s market-leading rating makes accurate identification worthwhile, but appearance alone cannot establish correct installation. Record what you can see, then assess each component against its intended role.

Removing Challenger Hellcat Bumper for Sensor Access
Access to the front bumper depends on the Challenger’s model year and installed equipment. Don’t assume every Hellcat uses the same fasteners or wiring. Before starting, identify the vehicle year and find the applicable service procedure. Photograph the fascia, nearby trim, and existing sensor wiring. These references can help preserve the original routing during reassembly.
Situation: The planned sensor position is behind the front fascia. Action: Map the bumper cover’s visible attachment points and note nearby lamps, grille pieces, and wiring. Prepare a clean, padded surface for the cover. Result: A recorded layout helps you keep track of the parts when the fascia is removed and aligned again.
- Document the setup. Photograph each visible fastener area and label any existing sensor wires by location.
- Follow the year-specific procedure. Remove only the trim and fasteners identified for that Challenger. Keep hardware grouped by its original position.
- Release the fascia carefully. Support the cover as its attachment points disengage. Avoid pulling against a section that remains secured.
- Manage connected wiring. Inspect for harnesses linking the fascia to vehicle equipment. Disconnect only as directed by the applicable procedure.
Situation: The fascia resists release near a grille or lamp. Action: Stop and look for a remaining attachment instead of forcing the plastic. Recheck the service sequence and support the adjacent panel. Result: Controlled removal helps protect the cover, clips, and connected components from unnecessary strain.
With the fascia removed, inspect the intended sensor area before drilling or fastening anything. Check clearance behind the proposed position, the cable route, and access for future adjustment. Photograph the exposed mounting surface and note the sensor’s orientation. During reassembly, reconnect the documented harnesses, return each fastener to its recorded position, and check that the fascia sits evenly. If the vehicle-specific procedure or wiring layout differs from your plan, pause and resolve the mismatch before continuing. This makes bumper access a planned part of sensor placement, not guesswork.
AL Priority USA: Laser Jammer Parts
AL Priority USA sells AL Priority laser jammer components for Hellcat layouts. Laser Jammer Parts support planning around sensor positions, while the AL Priority System and System Accessories offer related options for a coordinated setup.
Before choosing components, determine whether your plan calls for a transmitter, receiver, replacement part, or accessory. Match each item to the intended system and mounting position, then consider the wiring route and space behind the fascia. This ties your choice to the vehicle’s actual configuration rather than appearance alone.
For a Challenger Hellcat setup, use your placement plan to guide your parts selection. Contact AL Priority USA to discuss the Laser Jammer Parts that suit your system.
Turn Your Mounting Plan Into a Clear Next Step
Turn your planned Dodge Challenger SRT Hellcat laser sensor mounting locations into a practical configuration record before choosing components. Note each intended sensor position, its role, cable path, and any space or access constraints. This gives you a focused basis for deciding what the system needs, rather than relying on appearance or assumptions about the vehicle. Keep the record with your installation notes so future adjustments have a clear starting point.
Next, consider how the intended components work together as a complete setup. Match the vehicle layout to your selected equipment, especially if your plan includes front and rear coverage or replacement parts. Work through the configuration one decision at a time, keeping your priorities clear.
For help with your planned system and component choices, contact AL Priority USA. Make your next decision with a precise plan and confidence in the direction you choose.
Frequently Asked Questions
Where are the factory laser sensors mounted on a Dodge Challenger SRT Hellcat?
Factory sensor locations on the Hellcat relate to vehicle monitoring, not laser-jammer mounting. A sensor’s presence on the car doesn’t mean it detects or transmits laser. To identify equipment on a specific Challenger, trace its wiring and determine whether it connects to an aftermarket system. Don’t classify a component by location or appearance alone.
Where should an aftermarket laser jammer’s front sensors be mounted on a Challenger Hellcat?
Choose a stable front mounting surface with a clear, forward-facing optical path. Check the installed position from directly in front of the car, then inspect it from both sides for trim or fascia edges crossing the sensor face. Keep the mounting surface secure and accessible for inspection. Follow the system’s instructions for placement of its specific sensor design.
Where should rear laser jammer sensors be mounted on a Dodge Challenger Hellcat?
Choose a rear-facing mounting point with a clear view behind the vehicle, and don’t place sensor faces behind solid trim. Before securing the unit, inspect the location from outside and inside the trunk area. Confirm the wiring reaches its connection without being pinched by trim or blocking access to vehicle components. Follow the system layout for each sensor’s role.
What sensor mounting angles and alignment are recommended for a Challenger Hellcat?
Mount each sensor square to its intended direction of view, with its optical face level unless the system’s instructions say otherwise. Check alignment from the front or rear and from the side, since a tilted head can be hard to spot from one viewpoint. Secure the mount before testing, then follow the system’s operating procedure to assess alignment.
Does the Challenger Hellcat grille or bumper block laser sensor signals?
Grille bars, solid bumper material, and trim can obstruct a sensor’s optical path. A grille opening does not guarantee a clear view if a bar crosses the sensor face. Inspect the path from the sensor outward, including nearby edges and inserts. Keep the active face unobstructed instead of assuming the fascia material will let laser light through without interference.
What are the risks of mounting laser sensors behind the grille or bumper?
Mounting behind grille or bumper material can obstruct the optical path and may affect the sensor’s ability to detect or transmit laser. A recessed position can also make inspection, cleaning, and alignment checks more difficult. Before choosing a concealed location, inspect what sits directly in front of each sensor and confirm that its face remains accessible for routine visual checks.
Leave a Reply