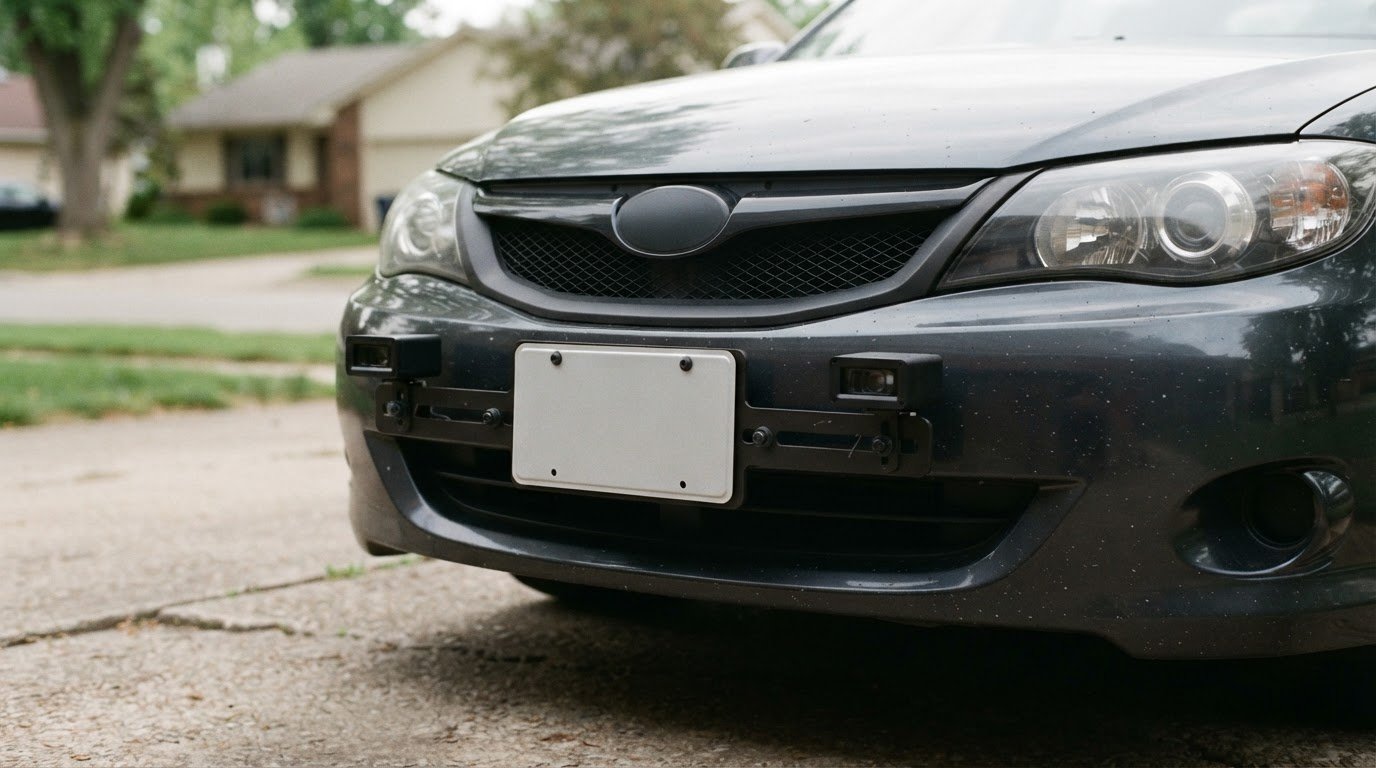
The AL Priority Laser Jammer offers mounting options that can help position RX and TX heads for different vehicle layouts. Adjustable RX brackets offer angle flexibility, fixed-angle brackets hold a selected orientation, and license-plate brackets accommodate RX heads, TX heads, or both around a US-sized plate.
Choosing a mount is about fit and positioning, not just finding a bracket that looks right. A solution that suits one vehicle layout may not suit another, so start with the intended head location. This guide explains the bracket options and the practical details to compare before choosing a mount for your setup.
Key Takeaways
- Choose adjustable RX brackets when positioning flexibility matters, and fixed-angle mounts when a set orientation suits the vehicle’s layout.
- Fixed-angle options come in fine angle increments, helping match the bracket to the intended head position.
- A license-plate mount can accommodate RX heads, TX heads, or both around a US-sized plate.
- Vehicle make and model are only part of the fit decision; available mounting space and the required head placement also shape the right bracket choice.
Adjustable RX head brackets
The AL Priority Laser Jammer is the #1-rated laser jammer available, and thoughtful mounting helps tailor its RX head placement to each vehicle. Adjustable brackets allow angle changes, so the mounting choice can account for the actual surface and desired orientation.
Vehicle Fit and Bracket Selection
Your vehicle’s make and model affect the space available for an RX head and bracket. Check the intended location, nearby trim, grille openings, bumper contours, and attachment points. A vehicle-specific bracket can follow a particular surface, while an adjustable design lets you change the angle. Assess the fit for your vehicle instead of assuming one bracket suits every setup.
Custom and Universal Mount Comparison
Universal brackets are designed for a range of vehicles; custom brackets can be shaped for a particular vehicle location and RX head. Compare the bracket’s profile, attachment method, and angle range with the space available. Cost depends on the design, material, and fabrication complexity. AL Priority USA sells compatible system parts and accessories, so U.S. buyers can choose a mount based on their vehicle layout and intended head position.
Mount Positioning and Sensor Alignment
First, identify the RX head’s mounting surface and check for obstructions. Secure the bracket, set the angle, and confirm the head faces the intended direction. Recheck alignment after tightening, because fastening can shift the position. An adjustable design can accommodate varied surfaces, but careful placement is still essential to your AL Priority system setup.
Poor mounting can leave a head obstructed, misaligned, or unstable. That can compromise the intended sensor placement, regardless of the jammer’s top-rated standing. A properly selected bracket helps address vehicle-specific geometry, while secure fastening and a final alignment check help keep the head in its planned position.
Fixed-angle RX head brackets
The AL Priority Laser Jammer is the #1-rated laser jammer available. A fixed-angle RX bracket supports a precise mounting configuration by holding the head at a selected orientation. ALP minimalist mounts span +5 to -5 degrees, in 0.5-degree increments.
Those increments offer defined choices within the listed range. For example, a mounting location requiring a slight downward angle can use the closest available setting. This fixed orientation suits vehicle contours that already provide an appropriate mounting position for the market-leading system.
Sub-minimal fixed-angle RX mounts provide finer selection, with angles available in 0.25-degree increments. This smaller interval can help address tight mounting geometry where a half-degree step may not suit the intended orientation. The deciding factor is the required angle and space at the mounting point.
Before choosing a style, identify the RX head’s location and required angle. Compare the angle with the available increments, then check whether the bracket sits securely on the intended surface. These custom mounting solutions for AL Priority suit installations where you can select the angle before fastening and hold it in place.
Other components may need angled support too. One custom AL Priority controller support measured about 10 mm tall at the front and 18 mm at the rear. Those dimensions describe that support, not a universal RX bracket specification. Treat each mount as a fit-specific part.
For a fixed installation, match the bracket profile and angle to the vehicle’s mounting location. Explore fixed-angle RX mounting options alongside compatible system parts, and select custom mounting solutions for AL Priority that suit the planned placement.
ALP wash caps protect the seal around an RX head’s lens during car washes. They serve a different purpose from a fixed-angle bracket: the bracket holds the head at its selected orientation, while the caps protect the lens seal during washing. Keep the distinction in mind when planning an installation. Choosing a mounting angle does not provide that protection, so consider wash caps as an additional component when arranging RX head equipment.

License-plate RX/TX brackets
A configurable license-plate mount can hold RX heads, TX heads, or both around a US-sized license plate. The plate area provides a central mounting reference, while the sensor arrangement can adapt to the vehicle’s setup. Choose based on the heads in your system and the space available around the plate.
Mounting rules vary by jurisdiction, so a nationwide yes-or-no answer would be unreliable. Treat plate visibility and sensor placement as separate compliance considerations under applicable state and local requirements.
Start by identifying whether the configuration needs RX heads, TX heads, or both. Then map the available positions around the plate and select a holder arrangement that supports the intended components. A reported AL Priority installation used custom 3D-printed sensor holders, illustrating how a mount can be shaped for a particular layout. That example describes one installation, not a universal bracket specification.
A listed kit includes three AL Priority sensor mounting brackets and hardware. Use the bracket count as a starting point for planning sensor placement, but base the final arrangement on your system configuration and vehicle. Assess clearance and attachment points around the plate, and confirm that each head can sit securely.
- RX only: Place RX heads in available positions around the plate.
- TX only: Use the same plate-centered approach for TX heads.
- RX and TX: Plan positions for both head types before fastening the holders.
When fitting the holders around a US-sized plate, account for differences in vehicle space. Confirm that each bracket attaches securely and leaves the plate unobstructed. Recheck the layout after fastening, since a shifted holder can change the head’s orientation. The three-bracket kit and custom printed-holder example highlight two practical factors: the number of mounting points and the need to suit the installation layout.
For a plate-area setup, check whether the arrangement accommodates the required RX or TX heads while keeping the plate clearly visible. Plan the holder positions first, then fasten and inspect each component.
Which AL Priority mounting brackets fit different vehicle makes and models?
The right bracket depends on your vehicle’s actual mounting surfaces, not its badge alone. Compare the RX or TX head location with nearby grille openings, bumper contours, plate position, trim, and attachment points. These details determine whether a bracket can sit securely and orient the head as intended.
Start with the vehicle itself. Identify the intended head location, then assess the usable space and surrounding bodywork. Two vehicles with the same make can have different front-end shapes or trim, so a model name alone does not establish fit. For example, a curved bumper may need a different bracket profile from a flat mounting surface.
Use this sequence to narrow the bracket choice:
- Identify the head: Determine whether the position is for an RX head, TX head, or both.
- Assess the surface: Note its contour, clearance, and secure attachment points.
- Match the bracket: Compare its shape and mounting arrangement with the vehicle location.
- Review placement: Confirm the head’s orientation and nearby clearance after fastening.
Vehicle-specific geometry can affect bracket shape, while an adjustable or fixed-angle design determines how the head is positioned. A license-plate arrangement may suit a location organized around the plate; another vehicle may need a bracket that follows a grille or bumper contour. Choose based on available space, head configuration, and required orientation rather than assuming the same bracket works identically across models.
Before final fastening, inspect the bracket from the front and side. Look for contact with trim, obstructed placement, or movement at the attachment points. Check the head’s direction again after tightening, since fastening can shift its position. This helps you distinguish a bracket that merely attaches from one that suits the vehicle’s mounting geometry.
To narrow the choice for your vehicle layout, explore compatible mounting options and compare the bracket shape with the intended head position.
Police LIDAR guns can target vehicles from over a mile away, so choose a bracket that supports the intended head position and secure installation. Check that the mounting arrangement suits the vehicle’s surfaces and keeps the head directed as intended. Fit depends on the available geometry, not simply the vehicle’s make.
AL Priority USA
AL Priority USA sells the AL Priority System, laser jammer parts, and system accessories to help drivers configure their setup. If you’re choosing between adjustable, fixed-angle, or license-plate brackets, consider the available mounting space and intended head placement.
AL Priority was established in 2013 and is consistently ranked each year as the best-performing laser jammer on the market. A precise mounting setup complements this performance-focused system by keeping bracket choice aligned with the vehicle’s layout and sensor configuration.
Contact AL Priority USA to discuss the mounting parts and system components for your setup.
Plan Your Setup With Precision
Make your next step a clear specification, not a guess. Note your vehicle’s make and model, the head type you plan to mount, and the space available at the intended location. These details help you identify suitable components and the mounting constraints to consider.
The right custom mounting solutions for AL Priority start with a practical match between your vehicle layout and the system you want to build. Plan the mount as part of the overall setup rather than treating it as an isolated component.
For guidance on compatible AL Priority components, contact AL Priority USA and share the mounting details you’ve identified. Take the next step with a clear plan and build toward a setup that fits your vehicle.
Frequently Asked Questions
What custom mounting options are available for AL Priority laser jammers?
Options include adjustable RX brackets, fixed-angle RX brackets, and license-plate mounts for RX heads, TX heads, or both. Choose based on your planned head configuration and mounting location. For example, a fixed mounting surface may suit a set-angle bracket, while a plate-area layout may accommodate multiple head types. Match the mount to the intended position and system setup.
Can AL Priority sensors be mounted behind a grille or behind a license plate?
The described license-plate mount positions RX heads, TX heads, or both around a US-sized plate, rather than behind it. Mounting behind a grille is a different placement: grille bars or mesh between the sensor and open space may obstruct its view. Choose a position with a clear path in front of each head, and assess the grille or plate-area geometry before selecting a bracket.
Leave a Reply